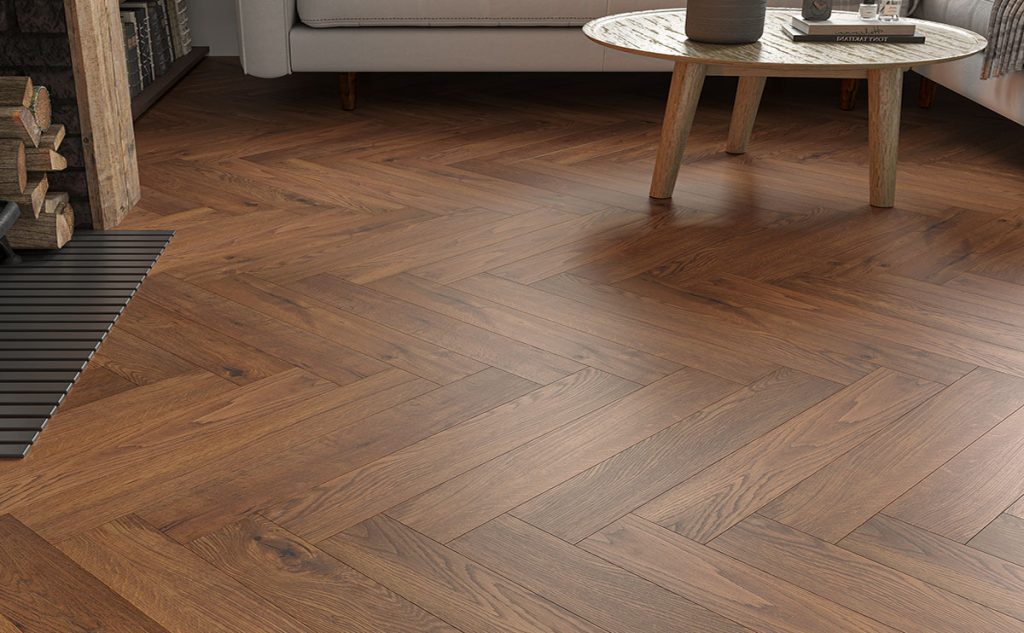
Engineered parquet flooring is a premium wood flooring solution made from individual blocks or short planks arranged in decorative patterns such as herringbone or chevron. Each block consists of a real wood wear layer bonded to a stable multi-layered core, offering improved dimensional stability compared to solid wood while retaining the character and appearance of natural timber.

Parquet flooring differs from straight plank flooring in both layout and installation. Because the pattern is built from multiple short pieces, accurate planning, precise set-out, and consistent alignment are critical. Small errors made at the start of installation can multiply across the floor, leading to pattern drift, uneven borders, or misaligned joints. For this reason, parquet installation requires greater attention to detail than conventional plank flooring.

This guide explains how engineered parquet flooring should be installed, covering essential preparation checks, subfloor requirements, layout planning, and step-by-step installation methods. It is intended to help ensure the floor is installed accurately, remains stable over time, and delivers a balanced, professional finish.

This guide is written for experienced DIY installers and professional floor fitters who want a clear, UK-relevant reference for installing engineered parquet flooring correctly.

Scope of this guide

This guide applies to:

  • Engineered parquet wood flooring only
  • Herringbone and chevron parquet patterns
  • Fully bonded (glue-down) installation as the primary and recommended method
  • Floating installation only where the parquet system is specifically designed and approved to allow it

This guide does not cover Versailles panels, which require different layout and installation techniques. For these products, refer to our Versailles Parquet Installation Guide.

Installation responsibility

Due to the technical complexity of parquet flooring, installation is recommended to be carried out by an experienced and competent floor fitter. It is the installer’s responsibility to assess site conditions, confirm subfloor suitability, and ensure all preparation, environmental, and installation requirements are met before work begins.

1. Parquet Types Covered


Engineered parquet flooring is supplied in different formats and joint systems. Understanding which type of parquet you have is essential before proceeding, as layout planning and installation approach depend on the construction of the boards.

This guide covers the following parquet types.

Herringbone Flooring Style Icon

Herringbone

Herringbone parquet is formed by laying short rectangular blocks at right angles to each other in a repeating zig-zag pattern. The blocks interlock visually rather than mechanically, meaning accurate alignment and consistent spacing are critical throughout the installation.

Engineered Herringbone parquet may be supplied with tongue & groove joints or as click-fit systems, depending on the product.

Chevron Flooring Style Icon

Chevron

Chevron parquet uses blocks that are cut at an angle so the ends meet to form a continuous V-shaped pattern. Unlike herringbone, chevron relies on precision-cut ends to create a straight central line.

Because the pattern depends on accurate angles, chevron parquet requires careful set-out and consistent positioning from the very start of the installation.

A/B Plank Systems

Most engineered parquet products are supplied as A and B planks (also known as left & right). These are paired boards with mirrored joint profiles that must be alternated during installation to form the correct pattern.

  • A planks and B planks interlock with joints on opposite sides
  • Planks must be installed in the correct sequence to maintain pattern alignment
  • Mixing or misplacing A and B planks will result in visible pattern errors

A and B planks may be supplied:

  • Mixed within the same box (e.g. one left-facing and one right-facing per row)
  • Split evenly within each pack
  • Or supplied in separate A and B cartons

Planks are typically identified by a label on the back marked A or B. They can also be distinguished by the joint layout: when the plank is facing upwards, the position of the two tongues and two grooves will differ between A and B boards.

Always identify and separate A and B planks before installation begins.

Click-Fit vs Tongue & Groove Parquet

Parquet flooring may use either a mechanical click-fit system or a traditional tongue & groove joint.

  • Click-fit parquet uses a factory-formed locking joint that allows boards to connect without adhesive. These systems are typically designed for floating installation, though some products may require or allow full bonding where specifically approved.
  • Tongue & groove parquet uses a traditional joint profile and relies on adhesive bonding for stability. This type of parquet is most commonly installed using the fully bonded method.

Confirm the joint system of your parquet flooring before continuing, as this determines which installation method is suitable.

Other Common Parquet Patterns


Engineered parquet flooring is also available in decorative patterns beyond standard herringbone and chevron. These layouts require different set-out, cutting methods, and installation sequencing and are not covered within this guide.

Versailles Panel Flooring Style Icon

Versailles

Basket Weave Flooring Style Icon

Basket Weave

Double Herringbone Flooring Style Icon

Double Herringbone

Subway Flooring Style Icon

Subway

2. Installation Methods Overview


Engineered parquet flooring can be installed using more than one method, depending on the construction of the boards, the joint system, and site conditions. Selecting the correct method before installation begins is critical, as parquet patterns rely on accuracy, stability, and consistent alignment.

This guide covers the following installation methods.

Fully Bonded Installation (Recommended)

A fully bonded installation involves fixing each parquet block directly to the subfloor using a flexible wood flooring adhesive. This method is strongly recommended for herringbone and chevron parquet.

Why bonding is preferred for parquet

  • Restrains individual blocks, reducing the risk of pattern movement
  • Maintains long-term alignment and pattern integrity
  • Minimises joint stress caused by seasonal expansion and contraction

Stability and movement control

Because parquet floors are formed from multiple small blocks, controlling movement is essential. Full bonding provides consistent support across the entire floor, helping prevent pattern drift, gapping, or distortion over time.

Suitable subfloors

Fully bonded parquet can be installed over:

  • Properly prepared concrete or screed subfloors
  • Suitable timber subfloors
  • Subfloors incorporating underfloor heating (where all UFH guidelines are followed)

Floating Installation (If Applicable)

Floating installation may be possible only where the parquet system is specifically designed and approved to float. This generally only applies to certain click-fit parquet systems.

Important considerations

  • Not all parquet products are suitable for floating installation
  • Floating parquet requires a suitable underlay
  • Floating systems allow greater overall movement than bonded floors

Movement considerations

Due to the nature of parquet patterns, floating installations carry an increased risk of movement compared to fully bonded floors. For this reason, floating installation should only be chosen where the product is explicitly designed for this method and site conditions are suitable.

Confirmation before proceeding

Before selecting a floating installation method, confirm that:

  • The parquet system is approved for floating installation
  • The correct underlay is specified
  • The increased movement characteristics are acceptable for the space

If in doubt, a fully bonded installation should be used.

Fully bonded Herringbone Flooring
Fully bonded installation: parquet blocks are fixed directly to the prepared subfloor using a flexible wood flooring adhesive for maximum stability and pattern control.
Floating Click System Install
Floating click installation: parquet boards are connected using a mechanical locking joint and installed over a suitable underlay without adhesive.

3. Tools & Materials Required


Before starting the installation, ensure all tools and materials are available and in good working condition. Parquet flooring requires precise layout and alignment, so having the correct set-out and measuring tools is essential.

Measuring & Set-Out Tools

  • Tape measure
  • Combination square or framing square
  • Chalk line
  • Straight edge or long spirit level

Cutting Tools

  • Handsaw, jigsaw, or circular saw suitable for wood flooring
  • Workbench or sawhorse for safe, accurate cutting

Installation Tools

  • Rubber mallet
  • Tapping block
  • Pull bar
  • Chisel (for detailed trimming and adjustments)
  • Drill and appropriate bits (for pipe holes, trimming, and finishing work)

Adhesive & Application Tools (Fully Bonded Installation)

  • Flexible wood flooring adhesive suitable for engineered parquet
  • Notched trowel specified for the adhesive being used
  • Specialist flooring adhesive wipes

Underlay (Floating Installation Only)

  • Suitable underlay approved for parquet flooring
  • Underlay tape where required

Measuring & Testing Equipment

  • Moisture meter suitable for the subfloor type

Safety Equipment

  • Knee pads
  • Safety goggles
  • Dust mask
  • Ear protection

4. Before You Start


Before starting the installation, ensure all tools and materials are available and in good working condition. Parquet flooring requires precise layout and alignment, so having the correct set-out and measuring tools is essential.

Board Inspection & Preparation

Before laying any parquet blocks, open several packs and review the boards to understand the natural variation in colour, grain, and character.

This step helps with:

  • Identifying boards with stronger visual character
  • Avoiding noticeable clustering of similar tones
  • Planning how boards will be distributed across the pattern

Parquet patterns repeat frequently, so early awareness of variation helps achieve a balanced and intentional final appearance.

Natural Variation

Engineered parquet flooring is made from real wood, and variation in colour, grain pattern, knots, and texture is a normal characteristic of the material.

These natural differences add depth and visual interest to the finished floor and should be taken into account during layout planning to achieve a balanced and consistent appearance across the pattern.

Colour Racking

Colour racking is particularly important for parquet flooring.

Before installation:

  • Open multiple boxes (typically 3–4 at a time)
  • Mix boards from different packs
  • Distribute lighter, darker, and more characterful boards evenly across the floor
  • Reserve boards with stronger variation for less prominent areas or perimeter cuts

This process helps prevent visible colour banding or repetitive patterns, which are more noticeable in herringbone and chevron layouts.

Acclimatisation & Climate Control

Engineered parquet flooring must be acclimatised in the room where it will be installed before fitting begins (minimum of 48 hours).

Acclimatisation guidelines

  • Store packs horizontally on a flat surface
  • Distribute weight evenly
  • Do not lean packs vertically against walls

Installation environment

The installation area must be stable and climate controlled:

  • Air temperature: 18–24°C
  • Relative humidity: 45–65%

These conditions should be achieved before delivery, maintained during installation, and kept consistent after installation is complete.

Site readiness

  • The building must be fully enclosed and weather-tight
  • All wet trades (screeding, plastering, painting) must be completed and fully dry
  • Flooring should only be delivered once site conditions are suitable

Maintaining correct environmental conditions is critical to minimise movement and ensure long-term parquet stability.

Important: It is the installer’s responsibility to inspect the flooring prior to installation. Once the flooring has been installed, it is deemed to have been inspected and accepted.

5. Subfloor Preparation


Correct subfloor preparation is essential to the performance and longevity of engineered parquet flooring. The subfloor must be assessed and prepared before installation begins. Installation should not proceed unless all requirements are met.

Parquet flooring relies on precise alignment and consistent support. Any issues with moisture, flatness, or structural stability will be reflected in the finished floor.

Subfloor Requirements – Summary

All subfloors must be:

  • Clean – free from dust, debris, old adhesives, paint, grease, or contaminants
  • Dry – within acceptable moisture limits for the subfloor type
  • Flat – within specified tolerances
  • Structurally sound – stable, secure, and capable of supporting the flooring system

Any loose areas, damaged sections, or underlying issues must be rectified before installation begins.


Concrete & Screed Subfloors

Concrete and screed subfloors must be fully cured, dry, and level before parquet installation.

Moisture testing

Moisture levels must be checked using appropriate testing methods suitable for the subfloor type. Readings should be taken across multiple areas of the floor to confirm consistency and suitability before installation proceeds.

As a general guide:

  • Concrete / cement screed:
    • Maximum 2.5% CM for cement-based screeds
    • Maximum 0.5% CM for anhydrite (calcium sulphate) screeds
  • Timber subfloors:
    • Maximum 14% moisture content

Ambient site conditions should be maintained at 18–24°C with 45–65% relative humidity during testing and installation.

Flatness tolerance

The subfloor must be flat to a tolerance of no more than 3mm over a 3m straight edge. Any deviations outside this tolerance must be corrected using appropriate levelling compounds.

Damp-proof membrane (DPM) requirements

  • Where required, a suitable damp-proof membrane must be installed to protect the flooring from residual moisture
  • DPM systems must be compatible with the chosen installation method and adhesive

Timber Subfloors

Timber subfloors must be dry, rigid, and securely fixed before parquet installation begins.

Suitable materials

  • Plywood
  • OSB
  • Existing timber floorboards

All boards must be firmly fixed with no movement, deflection, or bounce.

Secure fixing and flatness

  • Re-fix any loose boards before installation
  • Replace damaged or weakened sections
  • Ensure the subfloor meets the same flatness tolerance of 3mm over 3m

Further guidance

For detailed subfloor assessment methods, moisture management, damp-proofing solutions, and preparation best practice, refer to our Subfloor Preparation Guide.


Underfloor Heating (If Applicable)

Engineered parquet flooring may be suitable for use with underfloor heating (UFH), provided the parquet system, adhesive or underlay, and heating system are all confirmed as compatible.

Before installation:

  • The UFH system must be fully commissioned and pressure-tested
  • The subfloor must be dry and within the required moisture limits
  • The heating system must be switched off at least 24–48 hours before installation

During and after installation:

  • Floor surface temperature must not exceed 27°C (or the manufacturer’s stated maximum)
  • Use only UFH-rated adhesives or underlays as specified
  • The heating system must be brought back up to temperature gradually after installation by no more than 2°C per day

Rapid temperature changes increase movement stress and can lead to gapping or distortion. Stable environmental conditions must be maintained at all times.

For full commissioning procedures, temperature guidance, and compatibility considerations, refer to our dedicated Underfloor Heating & Engineered Wood Flooring Guide.

6. Set-Out Planning


Correct set-out is essential when installing parquet flooring. Parquet patterns repeat frequently and are visually unforgiving, so accuracy at this stage directly affects alignment, symmetry, and the quality of perimeter cuts. Time spent setting out correctly will prevent cumulative errors as the pattern progresses.

1

Establishing Centre Lines

Parquet flooring is normally installed working from the centre of the room outwards to achieve a balanced and symmetrical finish.

  • Measure the width of the room and mark the midpoint at both ends
  • Snap a chalk line between these points to create a straight centre reference
  • This line controls the position of the parquet pattern within the room

The centre line is used to ensure the pattern finishes evenly at both sides of the room rather than drifting towards one wall.

In larger rooms, it’s often useful to snap a second line at 90° to the first (see below). This provides a clear crosshair reference for checking squareness as the installation progresses away from the centre line.

2

Squaring the Room (Creating a True 90° Reference)

Even if a room looks square, it often isn’t. Parquet must be set out from a true 90° reference, not from the wall.

Create a perpendicular line from your centre line using one of the following:

  • Large framing square (where practical), or
  • 3–4–5 method (reliable for any room size)

3–4–5 method (simple explanation):

  • From a chosen point on the centre line, measure 3 units along the line and mark it
  • From the same starting point, measure 4 units in the direction of the perpendicular and mark it
  • Adjust the perpendicular mark until the diagonal distance between the two marks measures exactly 5 units
  • Snap the chalk line through the perpendicular mark.

(Units can be metres or any consistent measurement, e.g. 3m/4m/5m.)

This creates a dependable right-angle reference that allows the pattern to remain square as it is built outwards.

3

Choosing Pattern Direction

Decide the direction of the pattern before you start dry-laying.

Common approaches:

  • Along the longest visual axis of the room (often gives the cleanest flow)
  • Towards the main light source (helps the pattern read consistently)
  • Centred on a key feature such as a fireplace, bay window, or main entrance
  • Aligned through doorways for continuity into adjoining spaces (where relevant)

For herringbone and chevron patterns, small changes in starting position can significantly affect where the pattern finishes at walls and doorways. Choose the direction first, then finalise the set-out.

Large Oak Herringbone through Hallway
Large-format oak herringbone flooring, with the pattern direction aligned to follow the hallway and main circulation route for a cohesive flow between spaces.
4

Dry-Laying a Starter Module

Before applying adhesive or committing to installation, dry-lay a small starter section to confirm the set-out.

This step is used to check that:

  • the pattern orientation is correct
  • the layout is visually centred where required
  • perimeter and border cuts will be practical
  • the pattern remains square to the reference lines

Herringbone

Dry-lay a short starter run (commonly referred to as the spine) along the centre reference line. This section must be tight, straight, and square, as it becomes the primary guide for the entire installation.

For herringbone, the centre line should pass through the middle of the visual spine formed by alternating blocks.

Chevron

Dry-lay several paired boards across the reference line so the central “V” line is straight and consistent. Chevron patterns exaggerate even small inaccuracies, so alignment must be confirmed at this stage.

For chevron, the centre line should pass through the apex of the V-joints.

Once the starter section is positioned correctly, mark guide lines at the outer edge of the dry-laid area. These provide visual checks to help prevent drift as the installation progresses.

5

Managing A/B Planks (Where Applicable)

If your parquet uses A and B planks, organise them before set-out begins:

  • Separate A planks and B planks into two stacks
  • Confirm the correct alternation for the chosen pattern
  • Dry-lay the starter section using the correct A/B sequence before proceeding further

A/B systems must remain consistent. If the sequence is broken, the pattern will drift or fail to lock correctly.

6

Preventing Drift and Cumulative Error

Parquet patterns can “walk” (drift) over distance if you don’t control alignment.

To prevent drift:

  • Check squareness frequently against your 90° reference line, not against the wall
  • Use chalk lines or guide marks as visual rails for the edge of the pattern
  • Dry-lay and check every few rows before committing further (especially in large rooms)
  • Avoid forcing joints closed if alignment is off — correct the set-out instead
  • Measure to fixed reference lines, not from recently laid blocks (errors accumulate)

If the pattern begins to drift, stop and correct it early. Parquet is far easier to adjust in the first few square metres than after the installation has expanded.

7

Planning Perimeter Cuts and Edge Triangles

Perimeter finishing is where parquet looks either professional or messy. Plan it before fixing.

  • Aim for balanced cuts on opposite sides of the room where possible.
  • Avoid leaving very narrow slivers at walls — adjust the starting position slightly if needed.
  • Expect edge triangles at the perimeter of herringbone and chevron patterns. Plan for how these will be cut and fitted so the border remains clean and consistent.
  • Dry-lay to the perimeter in at least one area early on so you can see how the cuts will land before committing to a full installation.

Where thresholds or transitions are planned, consider how the pattern will meet them so the final row doesn’t finish with awkward, fragile pieces.

7. Installation – Step by Step


Each installation method must be followed independently. Do not mix installation methods within the same installation area unless the parquet system is explicitly designed to allow it.

7.1 Fully Bonded Installation

(Herringbone & Chevron – Primary Method)


A fully bonded installation is the preferred method for engineered parquet flooring. Each block is fixed directly to the subfloor using a flexible wood flooring adhesive, providing maximum stability and maintaining pattern integrity.

Installation should proceed in a controlled sequence, working from the established set-out lines and expanding the pattern evenly.

1

Preparing the Adhesive

Before installation begins:

  • Use a flexible polyurethane or MS polymer wood flooring adhesive suitable for engineered parquet and compatible with the subfloor
  • Check the adhesive open time and working time
  • Mix the adhesive if required, following the manufacturer’s instructions
  • Confirm the adhesive is suitable for:
    • the parquet joint system (T&G or approved click)
    • the subfloor type
    • underfloor heating (if present)

Only prepare the adhesive immediately before use. Do not begin installation until the adhesive and working conditions are confirmed.

2

Trowel Selection and Coverage

Correct adhesive coverage is critical for parquet stability.

  • Use the notched trowel specified by the adhesive manufacturer
  • A fine to medium notch is commonly used for parquet blocks, depending on adhesive type
  • The aim is full contact between block and subfloor, not spot bonding

Insufficient adhesive coverage can lead to hollow spots, movement, or long-term failure.

3

Applying the Adhesive

  • Apply adhesive only to an area that can be covered within the adhesive’s open time
  • Work in small, controlled sections, typically 1–2m² at a time
  • Hold the trowel at a consistent angle to maintain even ridge height
  • Do not spread adhesive too far ahead — avoid skinning or premature curing

⚠️ IMPORTANT: Adhesive Clean-up When using MS Polymer or Polyurethane adhesives, they are extremely difficult to remove once cured on the surface of the wood. Keep a pack of specialist flooring adhesive wipes on hand. If adhesive gets on the finished face of the board, wipe it off immediately. Once cured, it can permanently mar the finish.

4

Starting from the Reference Line

Installation must begin from the dry-laid starter module established during set-out.

  • Carefully lift the dry-laid starter section (often referred to as the spine)
  • Apply adhesive beneath this area
  • Re-lay the starter module directly into the adhesive, maintaining exact alignment with the reference lines
  • Press the blocks firmly into place

This starter section sets the alignment for the entire installation and must be positioned accurately before continuing.

5

Laying and Aligning Parquet Blocks

Once the starter module is bonded and stable, installation can continue by extending the parquet pattern outwards in a controlled sequence.

Working sequence
  • Continue laying blocks from the starter section outwards, adding complete pattern repeats (rows) rather than placing individual boards at random
  • Build the pattern gradually on both sides of the starter section, rather than completing one side of the room first
  • This approach helps keep the pattern centred and makes any alignment issues easier to correct early
Managing A/B planks (where applicable)

Where the parquet system uses A and B planks:

  • Install planks in the correct A/B sequence so each pattern repeat forms correctly
  • Each block must follow the intended orientation and joint geometry
  • If the sequence is broken, stop and correct it before continuing

Do not rotate or force blocks to make them fit.

Joint closure and block seating
  • Close joints firmly but without impact
  • Avoid knocking blocks in a way that disturbs previously laid sections
  • Seat each block into the adhesive using firm downward pressure, ensuring full contact with the adhesive bed

To prevent movement while fitting adjoining blocks:

  • Maintain pressure on the installed section
  • It is common practice to weight the starter section or early rows (for example, using unopened parquet boxes) to keep the pattern stable

If resistance is encountered, stop and check alignment rather than applying additional force.

6

Maintaining Alignment During Installation

As installation progresses:

  • Regularly check the pattern against the original reference lines
  • Make small corrections before the adhesive begins to grab
  • Do not rely on recently laid blocks as reference points

If alignment begins to drift, stop and correct it immediately. Minor adjustments are far easier while the adhesive is still workable.

7

Initial Curing Period

Once installation is complete:

  • Do not allow foot traffic for a minimum of 24 hours, or as specified by the adhesive manufacturer
  • Do not install trims, thresholds, or skirting during this period
  • Do not place furniture or apply point loads until the adhesive has fully cured

Proceed to finishing and detailing only after the bonded parquet has stabilised.

7.2 Floating Installation

(Where the Parquet System Allows)


Floating installation is only suitable for parquet systems that are specifically designed and approved to be installed without full bonding. This is typically limited to certain click-fit parquet products.

Before proceeding, confirm that the parquet system, underlay, and site conditions are suitable for floating installation.

1

Underlay Installation

  • Install the specified underlay over the prepared subfloor before laying any parquet
  • Lay underlay sheets flat and in accordance with the underlay manufacturer’s instructions
  • Where a DPM is integrated, allow the specified overlap and tape all joints as required
  • Where no overlap is specified, butt sheets tightly together without gaps
  • Tape all joints securely where required

The underlay must be compatible with floating parquet and suitable for the installation environment.

2

Starting Layout

  • Use the same set-out principles defined in Section 6 – Set-Out Planning.
  • Establish the centre reference and dry-lay a small starter section to confirm alignment
  • Do not use walls as alignment references
3

Engaging the Joints

  • Connect boards using the manufacturer’s specified click-fit technique
  • Ensure joints are fully engaged along their full length with no visible gaps
  • Do not force boards together or strike joints with excessive force

If resistance is encountered, stop and check alignment rather than applying additional force.

4

Progressing the Pattern

  • Build the pattern gradually from the starter section
  • Maintain correct A/B sequencing where applicable
  • Extend the pattern evenly rather than completing one side of the room first
  • Check alignment regularly against the reference lines

Floating parquet allows greater overall movement than bonded installations, so accuracy during installation is essential.

5

Waiting Time Before Use

  • Avoid walking on the floor until the installation is complete and stable
  • Do not install trims, thresholds, or skirting immediately after laying
  • Allow the floor to settle as recommended by the parquet manufacturer before use
!

Important Note

Floating installation carries a higher risk of movement compared to fully bonded parquet floors. Where stability, pattern control, or long-term performance is critical, a fully bonded installation should always be used.

8. Expansion & Movement Allowances


Engineered parquet flooring is made from real wood and will expand and contract in response to changes in temperature and humidity. Correct movement allowance is essential to prevent stress, distortion, or failure of the floor.

This section defines the movement rules that apply to all parquet installations, regardless of installation method.

Standard Perimeter Expansion Gap

  • Leave a continuous expansion gap of 10–12mm around the entire perimeter of the floor
  • The gap must be maintained at all walls and vertical obstructions
  • Expansion gaps must remain clear and unobstructed at all times

This gap allows the parquet floor to expand and contract freely as a single surface.

Doorways and Fixed Objects

Expansion gaps must also be left wherever the flooring meets fixed elements, including:

  • Door frames and thresholds
  • Structural columns or piers
  • Staircases
  • Radiator pipes and services
  • Kitchen units, islands, and fixed cabinetry

Parquet flooring must never be installed tight to fixed objects.

Larger Floor Areas

In larger or continuous installations, additional movement allowance may be required.

As a general guide:

  • Floors approaching or exceeding 80m² should be assessed carefully
  • Increased perimeter expansion (up to 15mm) may be required
  • Expansion breaks at doorways or transitions may be necessary

Large uninterrupted parquet areas increase the risk of cumulative movement and must be planned accordingly.

Environmental Variation

Floors installed in environments with greater temperature or humidity fluctuation will experience increased movement.

Consider additional allowance where:

  • Large glazed areas are present
  • South-facing rooms receive strong solar gain
  • Underfloor heating is installed
  • Seasonal humidity changes are expected

Stable site conditions should be maintained before, during, and after installation to minimise movement and protect the floor’s performance.

Trim and Fixing Rules

Movement allowance must not be restricted by finishing components.

  • Beading or scotia must be fixed to the skirting or wall, not the floor
  • Thresholds and transition profiles must be fixed to the subfloor, not the parquet
  • Trims must never be fixed through the parquet flooring

All trims must allow the floor to move freely beneath them.

Restricting movement with fixings can lead to lifting, gapping, joint stress, or distortion.

9. Finishing the Floor


Finishing details are carried out during the installation process, not after the floor is complete. Correct detailing allows the parquet floor to move freely while delivering a clean, professional result.

This section covers how to deal with pipes, door frames, trims, and final checks once the parquet has been laid.

Fitting Around Pipes and Services

  • Mark pipe positions accurately on the relevant parquet block
  • Drill a hole slightly larger than the pipe diameter to allow for expansion
  • Cut from the edge of the block to the drilled hole to create a removable section
  • Fit the block into position, then glue the cut section back into place behind the pipe
  • Cover the expansion gap using a pipe rose or suitable trim

An expansion gap must always be maintained around pipes and fixed services to allow natural movement of the parquet floor.

Engineered Flooring Fitted Around Radiator Pipe

Door Frames and Architraves

  • Undercut door frames and architraves so the parquet can slide neatly underneath
  • Use an offcut of parquet as a height guide when trimming
  • Do not force parquet tight against frames or thresholds

Where necessary, doors may need trimming before refitting to accommodate the increased finished floor height.

Ensure expansion space is maintained beneath frames and at thresholds so movement is not restricted.

Trims, Thresholds, and Beading

Trims are used to conceal expansion gaps and create clean transitions between floor finishes while allowing the parquet floor to move freely.

Beading or scotia

  • Must be fixed to the skirting or wall — never to the parquet flooring

Thresholds and transition profiles

  • Must be fixed to the subfloor — not to the parquet

Trims must never be fixed through the parquet flooring. Restricting natural movement can lead to gapping, lifting, joint stress, or long-term distortion.

Final Installation Checks

Once the parquet installation is complete and any required adhesive curing time has passed:

  • Remove all expansion spacers
  • Check that expansion gaps remain clear and unobstructed
  • Ensure trims and thresholds do not restrict movement
  • Confirm the pattern remains aligned and visually consistent

Do not place heavy furniture or apply concentrated loads until the floor has fully stabilised in accordance with the adhesive or manufacturer’s guidance.

Once these checks are complete, the floor is ready for normal use in line with the recommended care and maintenance instructions. For ongoing cleaning and protection guidance, refer to our Wood Flooring Care & Maintenance Guide.

10. FAQs – Engineered Parquet Flooring Installation


Engineered parquet is more stable than solid wood, but it’s still real timber and it still moves. Most parquet failures come from one of three things: poor subfloor prep, incorrect set-out, or using the wrong method for the joint system. These FAQs cover the key technical points installers and homeowners need to get right for a clean finish and long-term stability.

Can engineered parquet be installed as a floating floor?

Only if the parquet system is specifically designed and approved for floating installation (typically certain click-fit parquet systems). Many parquet products — especially tongue & groove blocks — are intended to be fully bonded.

Even when floating is allowed, parquet patterns are less forgiving than straight planks and can be more prone to movement and noise. For best stability and pattern control, fully bonded installation remains the recommended method.

Is engineered parquet suitable for underfloor heating (UFH)?

Yes, in many cases — but only when the parquet, adhesive/underlay, and UFH system are all compatible and the system is commissioned correctly.

Key points:

  • Use the correct UFH-rated adhesive (for fully bonded installs) or UFH-rated underlay (for floating installs).
  • UFH must be brought up to temperature gradually and controlled within the flooring manufacturer’s limits.
  • Stable room conditions matter: large swings in temperature/humidity increase movement risk.
Why does parquet need centre-line set-out instead of starting from a wall?

Because walls are rarely perfectly straight or square. Parquet is visually “unforgiving”: if you start from a wall, small out-of-square errors multiply and you’ll end up with pattern drift, uneven borders, and awkward perimeter cuts.

A centre-line (and true 90° reference) keeps:

  • The pattern square
  • The finish balanced on both sides
  • Perimeter cuts more consistent
What are A/B planks and why do they matter?

A/B (left/right) planks have mirrored joint geometry and must be alternated correctly to form herringbone or chevron patterns.

If the A/B sequence is broken:

  • The pattern will visually “walk”
  • Joints may not lock properly
  • You can end up forcing boards, which causes gaps and weak joints

Best practice is to separate A and B planks into two stacks before starting and dry-lay the starter section using the correct sequence.

What subfloor flatness do I need for parquet?

Parquet needs a flatter subfloor than many plank floors because the pattern has more joints and more opportunities for lipping.

As a general site rule:

  • Maximum deviation 3mm over 3m

If the subfloor is outside tolerance, correct it with a suitable levelling compound (or appropriate timber overlay solution). A subfloor that is “nearly flat” often shows up as visible unevenness once parquet repeats across the room.

What adhesive coverage is required for fully bonded parquet?

Parquet should be installed with full contact support, not spot bonding.

That means:

  • Use the trowel notch specified by the adhesive manufacturer
  • Work within open time
  • Press blocks firmly into place and maintain consistent bedding

Insufficient coverage can cause:

  • Hollow spots
  • Movement/noise
  • Long-term joint stress and pattern instability
What causes parquet “drift” during installation — and how do I prevent it?

Drift happens when small alignment errors repeat across the floor. The most common causes are:

  • Relying on recently laid blocks instead of the original reference lines
  • Not checking squareness frequently
  • Forcing joints closed when the pattern is slightly out
  • Building one full side of the room before the other (errors grow unnoticed)

Prevention:

  • Check against the 90° reference line regularly
  • Use guide marks/chalk rails as alignment checks
  • Build out evenly from the starter section
  • Stop and correct early — parquet is far easier to adjust in the first few rows than later on

11. Helpful Videos & Visual Guides


This guide is designed to be followed step by step, but parquet is one of those installs where a visual reference can help confirm technique — particularly for set-out, starter modules, A/B sequencing, and maintaining alignment as the pattern expands.

The videos below are intended as visual support only. Always prioritise:

  • The parquet flooring manufacturer’s instructions
  • The adhesive/underlay manufacturer’s instructions
  • Your site conditions and reference lines on the day

Fully Bonded Herringbone Installation Example

(Toffee Grain Oak – 125mm x 14mm Engineered Parquet herringbone)

This example demonstrates a fully bonded herringbone installation using engineered oak parquet. The video shows centre-room set-out, forming the starter spine using the triangle method, and managing adhesive open time during installation.

It provides a clear visual reference for the key stages of a glue-down herringbone floor.

Key techniques demonstrated:

  • Marking out accurate centre reference lines
  • Creating the starter triangle to form the central spine
  • Working within adhesive open time to maintain control
  • Cutting perimeter boards accurately along walls

This example reflects the fully bonded method outlined in Section 7.1 of this guide.

Always follow the specific adhesive manufacturer’s instructions and ensure site conditions meet the required environmental standards before installation.

Floating Click Herringbone Installation Example

(Engineered Click Parquet with Underlay)

This example demonstrates a floating click-fit herringbone installation over underlay, including centre-line set-out using a laser reference and formation of the starting “V” module.

The video also shows an additional stabilisation technique: applying adhesive to the short-end joints of the click system. In some click parquet systems, the short-end locking profile can be weaker than the long edge as it is a drop-lock. Applying a small amount of wood PVA adhesive can improve short-end bond strength and reduce movement within floating installations, where approved by the flooring manufacturer.

Key techniques demonstrated:

  • Creating the initial central “V” starter section
  • Establishing and marking the centre line using a laser level
  • Building the pattern evenly from the reference lines
  • Engaging click joints accurately without forcing
  • Applying adhesive to short-end joints to strengthen weaker connection
  • Maintaining consistent expansion gaps around the perimeter

Floating parquet systems require careful alignment and controlled movement allowance. Always confirm that the parquet system is approved for floating installation.

Final Note


Engineered herringbone & chevron parquet flooring delivers a precise and visually striking finish when installed correctly. The key to long-term performance lies in accurate set-out, proper subfloor preparation, controlled environmental conditions, and selecting the correct installation method for the joint system.

Parquet is less forgiving than straight plank flooring. Small errors at the beginning of installation can multiply across the floor, so time spent planning and checking alignment will always pay off in the finished result.

Always follow the specific parquet, adhesive, and underlay manufacturer’s instructions alongside this guide, and ensure site conditions remain stable before, during, and after installation.

When installed correctly, engineered parquet flooring provides a durable, stable, and balanced floor that will perform reliably for years to come.

Ready to Choose Your Parquet Flooring?

Browse our range of engineered herringbone and chevron parquet flooring, suitable for fully bonded and approved floating installations.

author-avatar

About Floor Warehouse

Floor Warehouse is a UK-based flooring specialist with over 15 years of combined industry experience in sourcing, selling, and advising on wood, laminate, SPC, and LVT flooring. Our expert advice is written to help homeowners, designers, and trade professionals make informed flooring decisions — from installation and maintenance to underfloor heating compatibility, sustainability, and long-term performance. All guidance is based on real-world product knowledge, manufacturer standards, and common questions we see every day from customers across the UK.