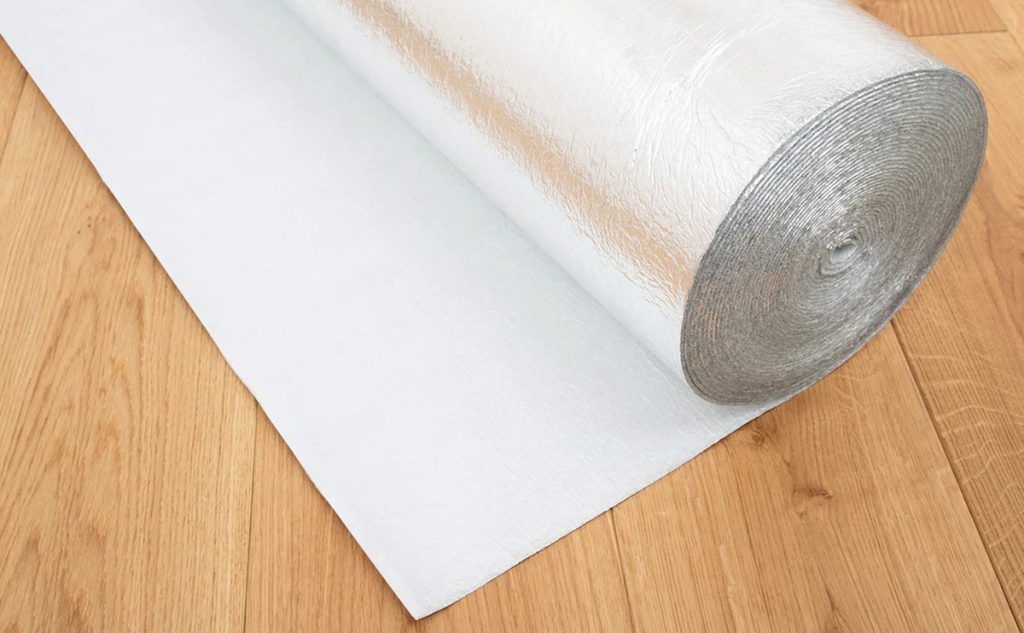
Laminate flooring is one of the most popular choices in UK homes due to its durability, affordability and straightforward click installation.
This guide explains how to install standard click laminate flooring correctly as a floating floor, following best practice for preparation, expansion and joint engagement.
If you are installing a patterned format such as herringbone, please refer to our dedicated Herringbone Laminate Flooring Installation Guide, as the set-out, sequencing and cutting process differs significantly from straight-lay plank systems.
Scope of This Installation Guide
This installation guide applies only to standard single-plank click laminate flooring installed as a floating floor. It is written to provide clear, practical guidance for domestic installations in typical UK home environments.
This guide applies to:
- Single-plank click laminate flooring
- Floating installation method (not fixed to the subfloor)
- Residential and light domestic spaces
This guide does not cover:
- Parquet or herringbone laminate formats (see dedicated herringbone installation guide)
- Glue-down laminate flooring systems
- Bathrooms, wet rooms, or areas subject to persistent moisture
Laminate flooring relies on controlled movement and dry conditions to perform correctly. Installations outside the scope above require alternative products, different methods, or professional specification.
Installation Guide Contents
- 1. Before You Begin – Acclimatisation & Site Conditions
- 2. Underfloor Heating Compatibility
- 3. Tools Required
- 4. Expansion & Movement Rules
- 5. Laminate Click Flooring Installation – Step by Step
- 6. Finishing Details & Aftercare
- 7. Frequently Asked Questions – Installation & Performance
- 8. Helpful Videos & Visual Guides
1. Before You Begin – Acclimatisation & Site Conditions
Correct preparation is essential for a successful laminate flooring installation. Laminate is a floating floor system and must be installed in stable, controlled conditions to allow for natural movement after fitting.
Acclimatisation
Before installation, allow the laminate flooring to acclimatise in the room where it will be installed.
- Acclimatise for 24–48 hours, following the manufacturer’s guidance
- Store packs flat and unopened in the installation room
- Do not acclimatise flooring in garages, sheds, or unheated spaces
This allows the boards to stabilise to the room temperature and reduces the risk of movement or gapping after installation.
Environmental Conditions
The following conditions must be maintained before, during, and after installation:
- Room temperature: minimum 18°C
- Floor temperature: minimum 15°C
- Relative humidity: 40–70%
Avoid installing laminate flooring if conditions fall outside these ranges.
Subfloor Condition Requirements
The subfloor is the foundation of the installation. Any imperfections will be reflected in the finished floor.
The subfloor must be:
- Dry – free from residual moisture
- Flat – no more than 2mm variation over 1 metre
- Clean – free from dust, debris, old adhesive, paint, or plaster
- Stable – timber subfloors must be firm, with loose boards securely fixed
Uneven or contaminated subfloors can cause poor joint connections, movement, or “crunching” noises underfoot.
Moisture Protection (Important for UK Homes)
Laminate flooring is wood-based and sensitive to moisture from below.
- A damp proof membrane (DPM) must be used over concrete or screeded subfloors
- Most modern laminate underlays include an integrated DPM — always check the underlay specification
- If in doubt about moisture levels, seek professional advice or carry out appropriate testing before installation
Suitable Subfloors
Laminate flooring may be installed over:
- Concrete or screeded subfloors (including water-based underfloor heating)
- Ceramic or porcelain tiles (if flat and securely bonded)
- Structural timber subfloors (floorboards or sheet materials, provided they are stable and level)
Laminate flooring must not be installed over:
- Carpet
- Vinyl or linoleum
- Existing floating floors
If the existing surface is not suitable, it must be removed or corrected before installation begins.
Pro Tip – Quick Level Check
Place a 1-metre straight edge or spirit level on the floor and shine a torch behind it. If you can see gaps greater than 2mm, the subfloor needs attention before laying begins.
Important: It is the installer’s responsibility to inspect the flooring prior to installation. Installation of the product confirms that the material has been checked and accepted.
2. Underfloor Heating Compatibility
Laminate flooring can be used with underfloor heating systems, provided the system is correctly specified, installed, and controlled. Temperature limits and system type are critical to ensure long-term performance.
Suitable Underfloor Heating Systems
Laminate flooring is suitable for use with the following systems:
- Water-based underfloor heating systems
- Electric underfloor heating systems embedded within a screed or concrete subfloor, where the manufacturer confirms temperature control
Temperature Limits
To prevent damage to the laminate flooring:
- Maximum surface temperature must not exceed 27°C
- Temperature changes should be gradual, avoiding sudden increases
Exceeding temperature limits can cause joint stress, movement, or surface damage and may invalidate product warranties.
Systems Not Recommended
Laminate flooring is not recommended for use with:
- Plate-based electric underfloor heating systems
- Any system where surface temperatures cannot be reliably controlled
Installation Notes for Underfloor Heating
- The underfloor heating system must be fully commissioned and tested before flooring installation
- Heating should be switched off during installation unless the flooring manufacturer states otherwise
- A suitable underlay designed for underfloor heating must be used to ensure efficient heat transfer
Once installation is complete, the heating system should be brought back up to operating temperature slowly, following the heating system and flooring manufacturer’s guidance.
3. Tools Required
Ensure all tools are available before installation begins. Stopping mid-installation can affect alignment and joint quality.
Essential Tools
These tools are required for most laminate flooring installations:
- Tape measure and pencil – for accurate measuring and marking
- Utility knife or laminate cutter – for trimming underlay and boards
- Saw (handsaw or electric) – for cutting boards to length
- Spacers – to maintain the required expansion gap
- Tapping block – for tightening click joints without damaging edges
- Rubber mallet – used with the tapping block only
- Pull bar – for securing boards near walls or in tight spaces
Additional Tools (Where Required)
These tools may be required depending on the room layout and subfloor type:
- Jigsaw or hole saw – for cutting around pipes, steps, or awkward shapes
- Combination square – for marking accurate straight and angled cuts
- Moisture meter – recommended for concrete subfloors
- Knee pads and safety eyewear – for comfort and protection during installation
4. Expansion & Movement Rules
Laminate flooring is a floating floor system and must be allowed to expand and contract naturally. Failure to provide adequate movement space is one of the most common causes of installation issues.
The following expansion and movement rules apply to all laminate flooring installations covered by this guide.
Perimeter Expansion Gaps
- Leave an expansion gap of 8–10 mm around the entire perimeter of the room
- Increase the gap to 10–15 mm in larger rooms, over underfloor heating, or in areas subject to temperature or humidity variation
- Expansion gaps must be maintained at walls, door frames, thresholds, and structural columns
Pipes & Fixed Objects
- Maintain the same expansion allowance around radiator pipes, structural posts, and built-in features
- Holes drilled for pipes must be oversized to allow movement
- Cover trims or infill pieces must not restrict floor movement
Layout Planning Before Installation
Before installing the first row, measure the room width and calculate the expected width of the final row.
If the final row will be less than 50 mm, trim the first row to achieve a more balanced layout. Very narrow final rows are difficult to install and can weaken the edge.
Underfloor Heating Considerations
- Use the upper end of the recommended expansion range
- Temperature changes must be gradual to minimise joint stress
Large Rooms & Continuous Areas
Internal expansion breaks may be required where laminate runs continuously across large or connected areas.
Most manufacturers require a movement break where the floor exceeds approximately 8–10 metres in any direction, or where flooring runs through multiple connected spaces.
Expansion breaks are typically formed using a T-bar or suitable transition profile and should be positioned at natural room divisions, such as doorways.
Always follow the manufacturer’s maximum run-length guidance.
Skirting & Trim Fixing Rules
- Skirting boards and beading must be fixed to the wall, not the floor
- Trims must not pinch or trap the laminate
- Expansion gaps must remain free at all times
No part of the laminate flooring should be fixed, glued, or otherwise restrained.
5. Laminate Click Flooring Installation – Step by Step
Follow the steps below in order. Laminate flooring must be installed as a floating floor and must not be fixed to the subfloor at any point.
Lay the Underlay
Roll out the underlay across the entire floor area, laying it parallel to the direction of the laminate boards. Butt edges tightly together without overlapping (unless the underlay includes an overlapping DPM section). Tape joints where required by the underlay manufacturer.

Set the Starting Position
Start in the left-hand corner of the longest straight wall. Place expansion spacers between the wall and the first row to maintain the required movement gap.
Lay the first plank with the tongue side facing the wall. Ensure the first row is perfectly straight, as this sets the alignment for the rest of the floor.

Plan and Maintain Stagger
Planks must be staggered for strength and appearance.
- Minimum end-joint stagger: 300mm
- Use offcuts from the previous row where possible
- Always place cut edges against the wall
Avoid creating repeating patterns or aligning joints too closely.

Connect Short Ends
Angle the short end of the next plank into the previous plank at approximately 30°, then lower it to lock the joint. Continue across the row, ensuring joints are fully engaged.

Lock the Long Edges
Once the short ends are connected, angle the plank into the long edge of the previous row. Apply gentle pressure and lower the plank until the joint clicks fully into place.

Tighten Joints Correctly
Use a tapping block and rubber mallet to close any small gaps.
- Always tap against the tapping block
- Never strike the laminate directly
- Excessive force can damage the click system

Use a Pull Bar Near Walls
Where space is limited, such as near walls or radiators, use a pull bar to draw the plank tightly into place. Apply controlled, gentle taps only.

Continue Across the Room
Measure and cut the final plank in each row, allowing for the required expansion gap at the wall. If the offcut is 300mm or longer, it can be used to start the next row to maintain correct staggering.
Continue row by row, checking alignment regularly and ensuring joints remain tight.

Cut Around Pipes and Fixed Features
When fitting around pipes or other fixed obstacles:
- Drill/cut oversized holes to allow for expansion
- Maintain the required movement gap
- Any infill pieces must not restrict floor movement

Trim to Fit Around Stair Steps
Cut boards carefully to fit around steps or vertical surfaces. Always leave an expansion gap between the laminate and vertical faces.

Remove Spacers
Once all boards are installed and secure, remove all expansion spacers from around the perimeter.

Fit Skirting and Trims
Install skirting boards or beading to cover the expansion gaps.
- Fix trims to the wall only
- Do not trap or compress the flooring

6. Finishing Details & Aftercare
Correct finishing and ongoing care help ensure your laminate flooring performs as intended and maintains its appearance over time.
Door Frames and Thresholds
- Where laminate meets door frames or architraves, trim the bottom of the frame so the flooring can slide underneath
- Maintain the required expansion gap beneath door frames and cover it with suitable trims if needed
- Use threshold strips where laminate meets other flooring types, ensuring movement is not restricted
Skirting Boards and Beading
- Skirting boards and beading are used to conceal expansion gaps
- All trims must be fixed to the wall, not the floor
- Do not force trims tightly against the laminate, as this can restrict movement
Furniture and Protection
- Fit felt or protective pads to the feet of furniture
- Lift furniture into position rather than dragging it across the floor
- Use soft castors or floor protection mats under chairs and heavy-use items
Cleaning and Maintenance
- Clean using a vacuum or soft brush to remove grit and dust
- Use a slightly damp microfibre cloth or mop for routine cleaning
- Wipe up spills promptly
- Do not use abrasive cleaners, steam cleaners, or excessive water
Following these finishing and care guidelines will help protect the click joints, surface finish, and overall stability of the floor.
For more detailed advice on day-to-day care, stain removal, and long-term maintenance, see our laminate flooring care and cleaning guide.
7. Frequently Asked Questions – Installation & Performance
These FAQs address the most common technical and practical questions around laminate flooring installation in UK homes. They focus on suitability, compliance, and long-term performance rather than repeating installation steps already covered in this guide.
Yes. Standard click laminate flooring is designed to be DIY-friendly and can be installed by confident homeowners who follow correct preparation and installation procedures.
However, professional installation is recommended for complex layouts, large open-plan areas, tight detailing, or where underfloor heating is involved, as errors in these situations can lead to movement issues or warranty problems.
Yes. Underlay is mandatory for all laminate flooring installations.
It supports the click system, improves acoustic performance, enhances underfoot comfort, and helps accommodate minor subfloor irregularities. Over concrete subfloors, the underlay (or a separate membrane) must also provide damp-proof protection.
Where underfloor heating is present, the underlay must be rated for heated floors.
The most common causes are:
- Insufficient expansion gaps
- Uneven or unstable subfloors
- Trapping the floor with skirting, trims, or heavy fixed furniture
- Excessive moisture or uncontrolled temperature changes
Laminate flooring must remain a fully floating system with free movement space at all perimeters and fixed points.
Yes. Laminate flooring is suitable for kitchens, hallways, and other busy domestic areas, provided the environment remains dry and stable.
Spills must be wiped up promptly, and prolonged moisture exposure must be avoided. Laminate flooring is not suitable for bathrooms, wet rooms, or areas subject to persistent water exposure.
Yes, provided the existing surface is flat, sound, clean, and securely fixed.
Tiles must be level with no loose or cracked sections, and timber subfloors must be rigid with no deflection. Carpet, vinyl, linoleum, and existing floating floors must always be removed before installation.
Yes. Expansion gaps are essential regardless of room size.
Laminate flooring expands and contracts naturally with temperature and humidity changes. Without adequate perimeter gaps — including at doorways, pipes, and fixed objects — the floor can lift, buckle, or stress the click joints, even in small rooms.
No. Laminate flooring is a factory-finished product and does not require sealing, oiling, or sanding.
Routine care consists of dry cleaning, occasional damp wiping with minimal moisture, and protecting the surface from grit, standing water, and heavy impact. Using steam cleaners or excessive water can cause damage and should always be avoided.
No. Heavy kitchen islands or fixed cabinetry must not be installed directly on top of laminate flooring.
Laminate is a floating floor system and must be able to expand and contract as a single unit. Fixing heavy objects on top effectively “pins” the floor to the subfloor. As surrounding boards move due to environmental changes, this restriction can cause:
Peaking (boards lifting at the joints)
Gapping in other areas
Damage to the click-lock system
Correct method: Install the kitchen island first, securing it directly to the subfloor. Laminate flooring should then be installed around the island, maintaining the standard 8–10mm expansion gap. This gap can be concealed using matching trims or the island’s plinth.
8. Helpful Videos & Visual Guides
This guide is written to be followed step by step, but some stages are easier to understand when you can see them done. The videos below provide visual reference for common laminate fitting techniques — especially joint engagement, door detailing, and maintaining correct movement gaps.
Videos should be used as a supplement, not a replacement, for the written instructions above. Always follow your laminate flooring and underlay manufacturer guidance where it differs.
Advanced Laminate Installation Techniques – Door Frames, Pipes & 4-Sided Click Systems
This video provides a more detailed walkthrough of laminate flooring installation in a real bedroom setting, with particular focus on cutting accuracy, door frame detailing, and correct plank engagement.
It is especially useful for visualising more technical stages of the installation process that DIY installers often find challenging.
Useful for visualising:
- Installing fibreboard underlay
- Cutting underlay neatly around corners and radiator pipes
- Correctly undercutting door frames so boards slide underneath
- Fitting laminate cleanly beneath architraves and door linings
- Maintaining proper plank stagger and spacing (avoiding H Joints)
- Templating around door frames and external corners
- Cutting accurately around radiator pipes
- Installing boards in reverse where required
Important technique highlight (14:30 onwards):
This section demonstrates a common difficulty when working with 4-sided click systems (non drop-lock profiles). After installing the first plank of the second row, engaging both the long and short edges of subsequent planks can be challenging.
The video shows how to angle and engage both joints correctly without forcing the click mechanism — a key detail for avoiding joint damage or edge breakage.
As always, focus on the installation principles shown rather than specific tools or brands used in the video.
Laminate Installation Fundamentals – Full Room Walkthrough
This video demonstrates the core principles of installing click laminate flooring in a standard square room layout. It provides a clear visual overview of preparation, underlay installation, board layout planning, and correct click-joint engagement.
Useful for visualising:
- Preparing the subfloor correctly before installation
- Installing rolled underlay with integrated DPM
- Measuring the room and planning a balanced board layout
- Understanding how the click locking system engages
- Laying the first and second rows accurately
- Maintaining staggered joints across the floor
- Cutting and fitting the final row correctly
- Removing spacers and fitting finishing trims (scotia/beading)
This video reinforces the importance of correct preparation, straight first-row alignment, and consistent expansion gaps — all of which are essential for long-term laminate performance.
While tools and brands shown may vary, focus on the installation principles demonstrated.
Need a Helping Hand?
This guide provides all the steps for a successful DIY installation, and many homeowners enjoy the process of laying their own laminate flooring. However, for more complex rooms or if you're looking for an absolutely perfect finish, professional laminate flooring fitters can be a great option. They can handle challenging layouts, intricate cuts, or any tricky areas, ensuring your floor looks flawless while still leaving the satisfaction of the project in your hands.
Final Note
Correct preparation, accurate layout planning, and strict adherence to expansion rules are essential for a successful laminate flooring installation. Laminate is a floating system and must always be installed in controlled conditions, over a suitable subfloor, with appropriate underlay and damp-proof protection where required.
Taking the time to prepare properly and following the installation steps carefully will help ensure long-term performance, stable joints, and a clean, professional finish.
If you are unsure about subfloor suitability, moisture levels, underfloor heating compatibility, or room-specific detailing, we recommend seeking professional advice before proceeding.
Ready to Choose Your Laminate Flooring?
Explore durable, easy-to-install click laminate flooring in a range of realistic wood finishes — ideal for stylish, low-maintenance UK interiors.
About Floor Warehouse
Floor Warehouse is a UK-based flooring specialist with over 15 years of combined industry experience in sourcing, selling, and advising on wood, laminate, SPC, and LVT flooring. Our expert advice is written to help homeowners, designers, and trade professionals make informed flooring decisions — from installation and maintenance to underfloor heating compatibility, sustainability, and long-term performance. All guidance is based on real-world product knowledge, manufacturer standards, and common questions we see every day from customers across the UK.
View all posts by Floor Warehouse